Mediterranean Maelstrom

- Introduction
- Dates and Times
- Summary of Rules
- Maps
- Historical Context
- Victory Conditions
- Summary of Constraints
- Order of Battle
- Frame 1 - Represents May 9, 1942
- Frame 2 - Represents August 12, 1942
- Frame 3 - Represents August 13, 1942
- Frame 4 - Represents August 14, 1942
- Settings
Table of Contents:
Introduction
Malta, a 95 square mile island south of Sicily in the middle of the Mediterranean Sea. Fought over for centuries, the outbreak of the desert campaign in North Africa in 1940 found the island astride the Axis supply lines from mainland Europe to Africa. Malta was the center of some of the fiercest air battles of World War II. Savage sea battles were fought on the approaches to the island as desperate attempts to resupply the island were launched. The summer of 1942 was the peak of the battle for Malta. The whole Mediterranean theater hinged on the outcome. Join us for savage air battles and desperate sea battles. Fly for the Allies in the Spitfire V, Seafire, Martlet (F4F) and SeaHurricane IB. Or fly for the Axis as they strike Malta with their Bf-109Fs, C.202s, Ju-88A4s, Ju-87Ds and Me-110Cs. A powerful vortex is forming drawing in men and machines from all over the Mediterranean towards a small rocky island which is destined to go down in history. Join us for Mediterranean Maelstrom!
Dates and Times
Show-Up Time for this scenario is 3 pm Eastern Time (3 pm New York, USA time) in the Special Events II arena. You can use this time converter to find the correct time in your time zone. Frame dates are as follows.
- March  2, 2013 Frame 1
- March 9, 2013: Frame 2
- March 16, 2013: Frame 3
- March 23, 2013: Frame 4
The arena is locked to admittance at Show-Up Time, so please show up no later than Show-Up Time. (Takeoffs start 30 minutes after Show-Up Time, the time in between being used for briefings and to get organized.) If you get disconnected and need back into the locked arena, please type into any text radio buffer: ".p BROOKE let me in". Then keep trying to get in (even if the game shows Special Events II as being locked -- try entering still, as the status does not always update quickly). Once you are in, type ".p BROOKE i'm in".
Frames will run for 3 hours after takeoff, then a disengagement will be called (whereupon players will cease combat, if any), and planes will have 15 minutes to land.
Summary of Rules
- Pilots get two lives unless otherwise noted.
- A pilot uses up a life if he dies, bails, ditches, does not get a "landed successfully" message, or if he exits (end sortie) at anything other than his takeoff base (except for Frame 1 Carrier launched MkV Spits.).
- Allies can refuel at any friendly base, except that land-based aircraft cannot refuel at a carrier.
- Deaths as a gunner do not subtract from your available lives.
- Maximum altitude of 30,000 ft for all fighters.
- Bombers are restricted to 20,000 ft altitude or less.
- Formations of Ju-88s with bombs can level bomb only, they must use the bomb sight. (no glide or divebombing).
- Formations of Ju-88s may use torpedos and single Ju-88s may dive bomb. As such they may manuver and drop them without invoking restriction noted above.
- When you have no more lives, please consider volunteering to be a gunner or man a gun on a ship.
- If you get disconnected (dumped), ask the CM if you can launch again. If he says "yes," you can do so without the disco subtracting one of your lives.
- Launches from aircraft carriers which end in a crash or ditch do not count against a player's life. Let your Group Leader know, then Exit and replane.
- Landings on an aircraft carrier which end up in a crash or ditch do count as a player's life.
- Your CO can have you ejected from the arena if you are not following orders, breaking rules, being insubordinate, or being a nuissance to your side.
- Do not fly into the "cyan" boundary of the map unless you are chasing an enemy off the operations area.
- Allowed Targets (the ground objects allowed as targets each frame) are those at the Strategic Targets, at the Additional Targets, and at the enemy's list of Active Bases, listed for each frame. Towns at airfields are not legitimate targets. No other ground targets should be attacked.
- CO's may distribute players as they see fit among squadrons as long as the number of pilots in each squadron does not exceed the maximum strength listed in the Order of Battle.
- Each squadron may launch from its assigned base only (unless your CV is sunk -- see below).
- All 5" turrets will be disabled.
- 40 mm and 20 mm guns will remain active on all ships.
- 8 inch guns remain active and may not be used against shore targets.
- Sea Hurricanes may not use the cannon gun package.
- Me-110C's may carry bombs.
- Basing:
- Royal Navy squadrons must use the ships listed in Order of Battle. If that ship is lost they may reup on another CV. If all CVs are lost, a CM will re-enable a CV without escorts. Sinking this CV will not count toward victory.
- Royal Air Force units must use bases assigned to them.
- Luftwaffe and Regia Aeronautica units must use bases assigned to them.
- Purple bases may be used by the Axis for rearming only. Exiting from the plane at these bases counts as a sortie to the pilot, but does not count as a lost aircraft. Allied aircraft may not attack these fields.
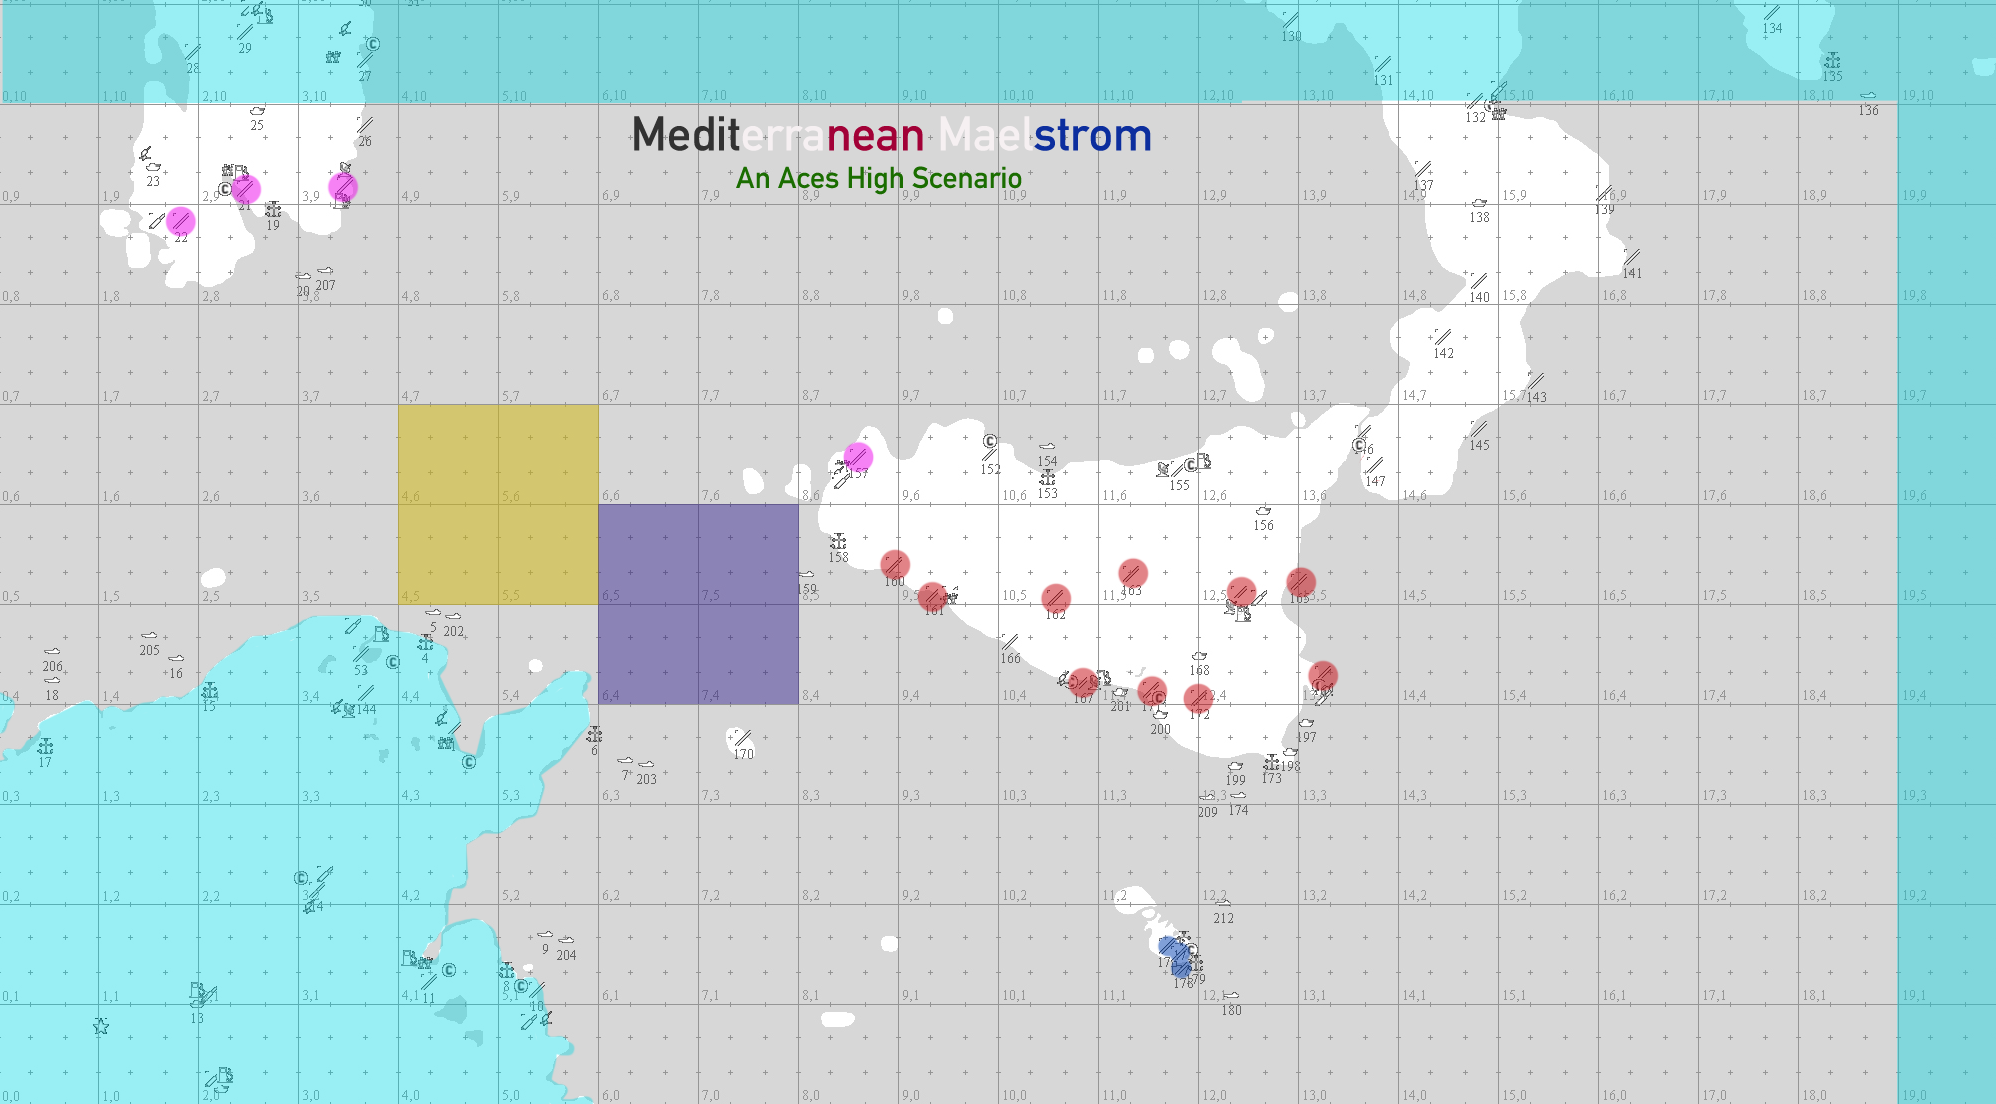
Map
Historical Context
Overview
Summer 1942
The island of Malta has played a part in the history of the Mediterranean basin for more than 2,500 years. Carthaginians succeeded Phoenicians, followed by Romans, Arabs, Normans, Sicilians, French, Spaniards, the Knights of St John, Bonapartist French, and finally the British. Britain took possession of the island in 1800 and almost immediately turned it into a naval base. With the opening of the Suez Canal and the introduction of steam into the navy, Malta’s importance increased, and by World War I it figured heavily into British naval strategy.
World War II was to be no different. When Italy entered the war on June 10, 1940 Malta came under air attack from Sicily. There were 34 heavy AA guns and 8 light AA guns on the island. The air defense consisted of 3 Gloster Gladiators. Over the next two years efforts had been made to reinforce Malta. The early convoys were successful, but eventually the losses in men, ships and planes soared.
Air strength which defended the Island from Axis attacks was the lynchpin. 1941 could be called the "Hurricane Year" of Malta, but 1942 was definately the "Spitfire Year". The squadrons of the RAF deployed on the island lived and fought with Spitfires brought into the island. The main source of these aircraft was from aircraft carriers which penetrated the Mediterranean to a point west of Sicily and launched these land based planes from the decks before turning and running back west to Gibraltar. To aid in these takeoffs small chocks of wood were put into the flaps of the spitfires to allow partial flaps for takeoff. The flaps were then cycled down and the wood dropped away. In early July increased German air activity was wearing away the number of Spiftires available on the island. An attempt made in April to reinforce the squadrons on the island ended in disaster. The incoming planes were caught on the ground a large number were lost. It was decided that yet another run by a carrier needed to be made. On May 9, 1942 the USS Wasp made here second reinforcement run to Malta, launching 40 Spitfires in company with HMS Eagle to the island.
The history of convoys to Malta was long and bloody. The first convoy since September 1941 was ‘M.W. 10’ in March 1942 and only 3 ships made it to Malta and they were all sunk in the harbor. By the third summer of the war Malta was in trouble. Due to lack of fuel, ordinance, spare parts and planes it had ceased to be an offensive threat against the Afrika Korps supply lines from Italy. In June 1942 a dual attempt was made with one convoy Gibraltar and one from Alexandria. Only 2 ships of the 17 made it to Valetta. Malta was in dire straights. 26,000 tons of supplies were needed every month for the 270,000 inhabitants, and the June convoy brought only 15,000 tons into harbor. While Spitfires could be flown in from the western Mediterranean via aircraft carriers such as the USS Wasp and HMS Eagle, and aviation fuel could be brought in via submarine and HMS Welshman (a fast converted minelayer), food and fuel oil were needed in large quantities.
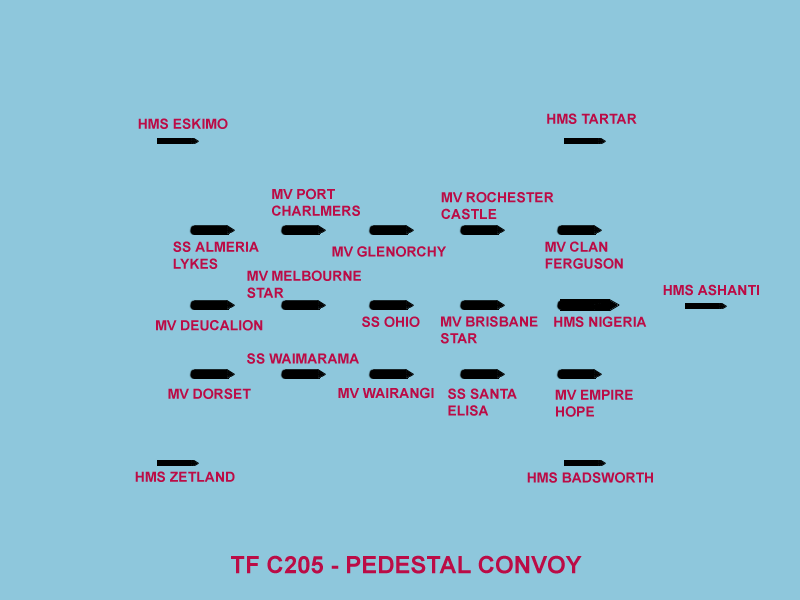
While the reinforcements of Spitfires aided the Royal Air Force's ability to hold the island, Malta was starving. The Admiralty in London looked at their resources and marshaled those available in a final all out effort to get the vitally needed supplies to the island. The operation was codenamed “Pedestal†and was to consist of 14 large fast ships including the American owned tanker Ohio, with 12,000 tons of fuel and oil aboard. The efforts of the Admiralty bore fruit. The assembled escort was formidable, the most powerful yet to accompany a Malta bound convoy. There were no less than 3 carriers, two modern fleet carriers Victorious and Indomitable and the veteran Eagle. Two battleships Rodney and Nelson were to lead the line of battle with 6 cruisers, an anti-aircraft cruiser, and 32 destroyers rounding out the escort. Spoiling raids upon Axis airfields on Sicily were laid on with strike aircraft from Malta and Liberators from the Middle East.
Victory Conditions
Operating with the strategic and tactical situation in the theater in mind will create a historical environment for the players as well as a path toward victory for your side. Objectives are met when a percentage of the aircraft and physical objects are destroyed. This formula will be based on the registration numbers and will be relayed to the Side COs. In theory, assume that shooting down Axis Aircraft, to achieve the objective, means shoot them all down, destroy airfield means destroy it, completely. This is a Win or Lose objective based event. Both sides have an equal chance of completing the objectives in each frame.
- Frame 1 Objectives.Â
- Shoot down Axis aircraft.
- Get the Spitfire reinforcements to Malta landed and/or rearmed.
- Preserve the fighters which reach Malta. (No leaving the frame early)
- Destroy Allied airifelds.
- Shoot down Spitfires.
- Destroy buildings in Valletta.
- Frame 2, 3 and 4 Victory Conditions Combined. Ships lost are eliminated. In the event that the Allies lose all of their designated CVs, a "generic" CV will be enabled to allow the Allies a continued place to launch. This final CV will not be used for scoring purposes, and if sunk, will be immediately respawned. In effect, a non target.Â
- Shoot down Axis aircraft.
- Protect the Carriers.
- Get the merchant ships to sector 12,1,4.
- Protect Port facilities and other Axis objectives
- Sink Allied merchant ships.
- Shoot down Allied aircraft.
- Destroy Allied port facilities.
- Sink Allied Carriers and other naval vessels.
- Destroy Allied fuel reserves on Malta.
- Destroy Allied airifelds.
- Allies:
Axis:
- Allies:
Axis:
Summary of Constraints
In addition to any limitations listed in the "Summary of Rules" section:
- Shipping shall start in any of the areas highlighted for their use.
- In frame 1 - USS Wasp launches reinforcement Spitfires from the blue squares.
- In frame 2 - Pedestal Convoy and Force Z start in the gold squares. Fleets may jump a maximum of one sector from their end point of the previous frame at the start of frames 3 and 4. This may or may not be allowed for Sector 4 based upon the Lead CM's call for playability.
- Bombers:
- Axis may not mass all three bomber gruppen against a single area of operations, for example the convoy or shipping. They must utilize a minimum of 1 bomber Gruppen against either Malta or shipping. They can divide bomber gruppen to concentrate 1.5 gruppen against either one. This is to avoid boredom.
Order of Battle
Allies (Royal Air Force / Royal Navy) Order of Battle
Allies have a max of 96 pilots distributed as follows.
| Squadron | Aircraft | Airfield | Max. Pilots | |
| Royal Air Force, Based at Malta |
98 | |||
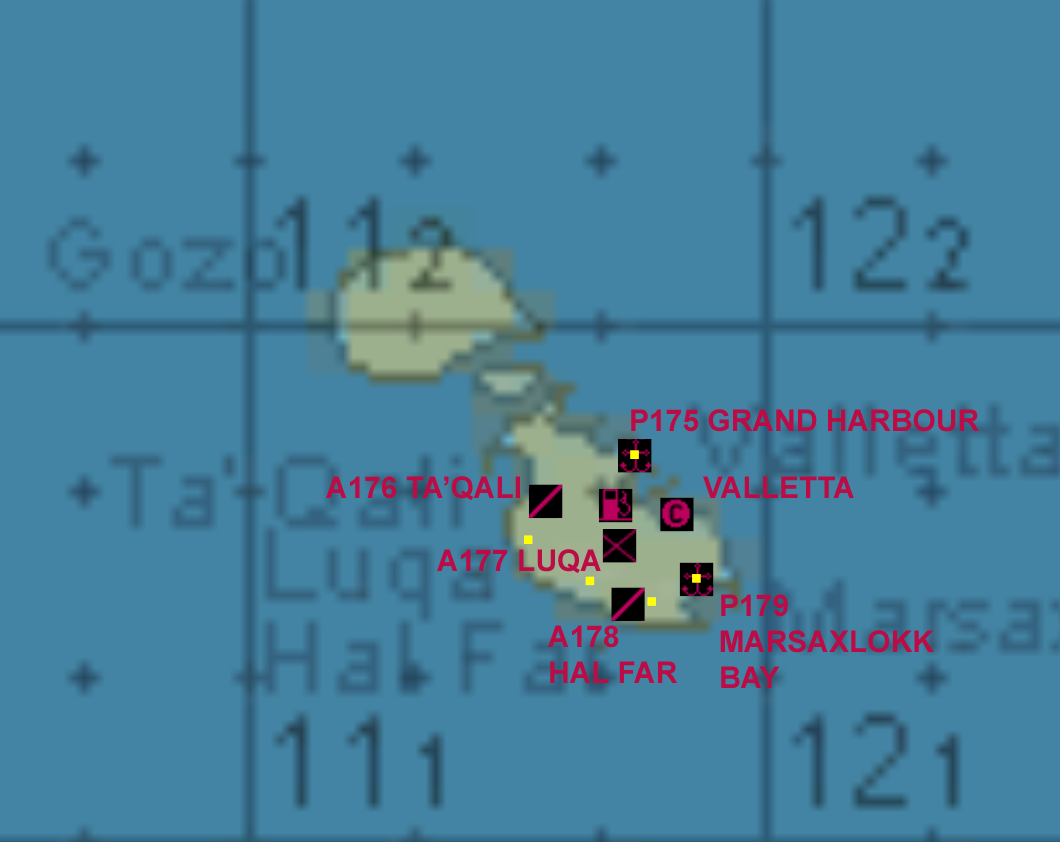
| 126 Squadron | Spitfire Mk V | A176 | 12 | |
| 185 Squadron | Spitfire Mk V | A177 | 12 | |
| 229 Squadron | Spitfire Mk V | A177 | 12 | |
| 303 Squadron | Spitfire Mk V | A178 | 8 | |
| 1435 Squadron | Spitfire Mk V | A178 | 8 | |
| Royal Navy | ||||
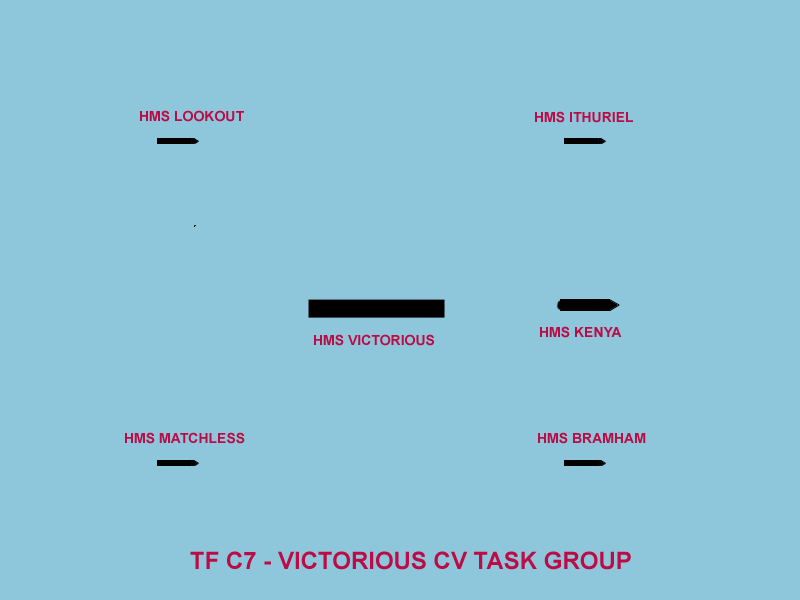
| HMS Victorious | C7 | |||
| 885 Squadron FAA | Sea Hurricane IB | 6 | ||
| 809 Squadron FAA | Seafire Mk II | 14 | ||
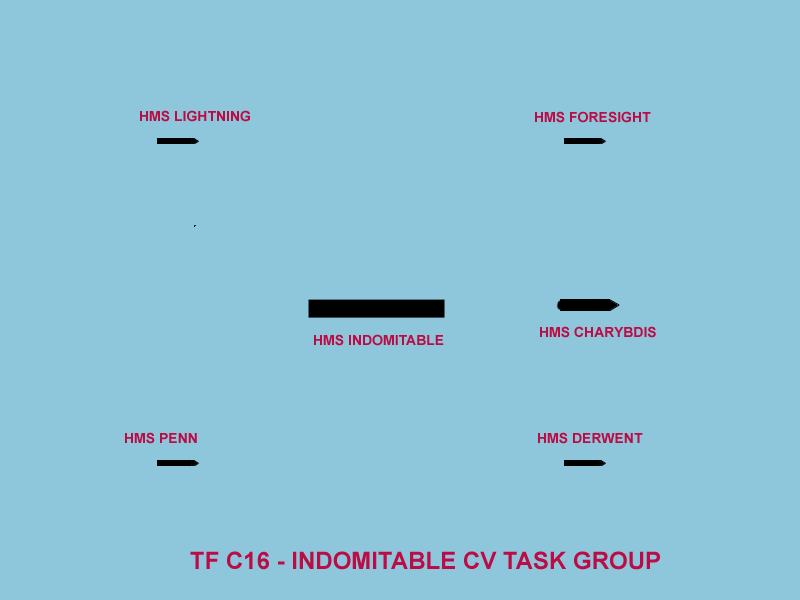
| HMS Indomitable | C16 | |||
| 880 Squadron FAA | Hurricane IB | 6 | ||
| 806 Squadron FAA | Martlet | 10 | ||
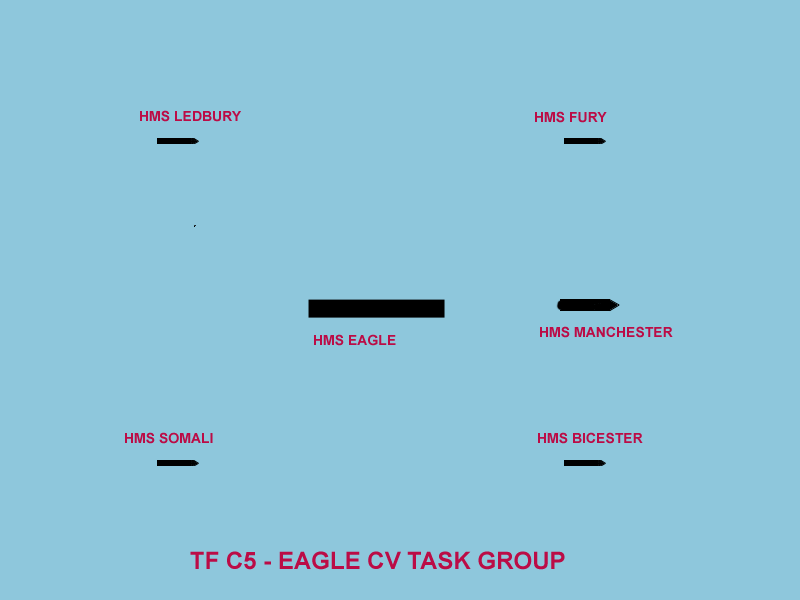
| HMS Eagle | C5 | |||
| 801 Squadron FAA | Sea Hurricane IB | 10 | ||
| USS Wasp | C7 | |||
| Reinforcement Spitfires | Spitfire V | 46 |
** If your CV is sunk, use a sister ship or if all carriers are down, let the side CM know and he will restore a CV.
HMS Victorious Task Force "C7"
HMS Eagle Task Force "C5"
Pedestal Convoy Task Force "C205"
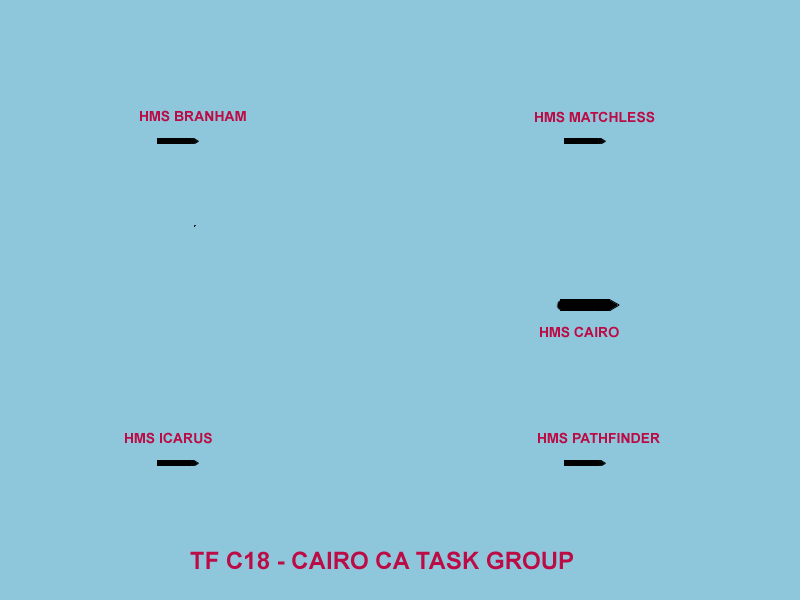
HMS Cairo Task Force "C18"
Axis (Luftwaffe / Regia Aeronautica) Order of Battle
Axis have a max of 110 pilots (max of 86 fighter pilots, 24 bomber pilots) distributed as follows.
| Gruppen | Aircraft | Airfield | Max. Pilots | |
| Luftwaffe | 110 | |||
| Jadgdegeschwader 77 | ||||
| I/JG 77 | ||||
| 1 Staffel | Bf-109F4 | A162 | 12 | |
| 2 Staffel | Bf-109F4 | A161 | 12 | |
| 3 Staffel | Bf-109F4 | A162 | 12 | |
| Jagdgeschwader 53 | ||||
| Stab | Bf-109F4 | A172 | 6 | |
| II/JG 53 | ||||
| 4 Staffel | Bf-109F4 | A167 | 8 | |
| 5 Staffel | Bf-109F4 | A171 | 8 | |
| 6 Staffel | Bf-109F4 | A172/td> | 12 | |
| Zertorergeschwader 26 | ||||
| 8/ZG 26 | Me-110C4 | A160 | 8 | |
| Kamfgeschwader 54 | ||||
| I/KG 54 | Ju-88A4 | A163 | 8 | |
| Kamfgeschwader 77 | ||||
| II/KG 77 / Ju-87D | Ju-88A4 | A165 | 8 | |
| II./StG 1 | Ju-88A4 / Ju-87D | A164 | 8 | |
| Regia Aeronautica | ||||
| 51 Stormo CT | ||||
| 20 Gruppo | C.202 | A169 | 8 |
Note: II/KG77 has two lives in Ju-88s (w/form) and one life in Ju-87D. III/KG77 has one life in Ju88 (w/form) and two lives in Ju-87D.
Frame 1
May 9, 1942:
The situation for the Royal Air Force on Malta has become desperate. Losses in Spitfires are such that within a short time the island will again be defenceless. But without reinforcements now, the island's defenders will be too weak to support the upcoming effort. USS Wasp has embarked 40 Spitfires to fly off and reinforce the island. Last time this was tried on April 20, 1942, the Axis was able to detect the incoming planes and launched heavy strikes against the island. Within 48 hours there were only 7 Spitfires left. Plans have been made for a quick turn around of all incoming Spitfires this time. Trials have shown that planes can be rearmed and refueled in between 4 and 7 minutes ready again in 15 minutes to take off and defend the island.
As the sun rises, the USS Wasp has launched F4Fs for CAP and the Spitfires are starting their engines in the hangar and are ready to be brought up on deck. In due time the Axis patrols spot the incoming planes and pre-planned strikes are readied to be launched at Malta.
USS Wasp will be located in one of the "blue" squares on the map for the launch. Immediately after launch the Task Group will be jumped clear and is NOT a valid target. The reinforcement Spitfires are to make their way to Malta, and are to choose an airfield to land and rearm/refuel. This can be done from the re-arm pad or by landing and replaning. Once a base is chosen that player must use that has his home field for the rest of the frame.
Luftwaffe and Regia Aeronautica Strategic Targets:
August 12, 1942:
The Pedestal Convoy and Force Z has sortied into the Mediterranean. HMS Furious has flown off her reinforcement Spitfires to the island yesterday and has turned back for Gibraltar. Today the convoy is approaching the area north of Tunisia and south southeast of Sardinia. Axis scouts have found the convoy late in the previous day and know approximately where it will be at dawn. On Sicily the Luftwaffe and Regia Aeronautica were prepared for strikes both at the oncoming Convoy and Malta itself.
On Malta the Royal Air Force readies for a maximum effort to defend the Island against strikes sure to attempt to destroy the dock and cargo facilities, as well as reduce the number of fighters available for air cover.
Luftwaffe and Regia Aeronautica Strategic Targets:
Frame 3
August 13, 1942:
The Pedestal Convoy and Force Z has sortied into the Mediterranean and is now fighting it's way to Malta. Axis forces continue attacks against the convoy, it's escorts and Malta itself.
Luftwaffe and Regia Aeronautica Strategic Targets:
Â
Frame 4
August 14, 1942:
The Pedestal Convoy and Force Z has sortied into the Mediterranean and is approaching Malta for the final dash for the relative safety of the island's main port at Grand Harbor.
Luftwaffe and Regia Aeronautica Strategic Targets:
Â
Settings
Weather: Weather might be varied with low-lying clouds at times mixed with medium and high altitude cloud banks. Bad weather is possible with heavy clouds at varying altitudes.
Terrain: ITALY
Wind: 0 mph at 0-5k altitude, 5 to 10 mph from one direction on up. Weather forcasts will be broadcast at least the day before the frame.
Radar and Sector Counters: Sector counters will show when a plane is within 35 miles of radar towers and above 1500 ft. Planes above 30,000 ft will show as dots on radar. Radar updates every 2 minutes.
Destroyed Objects: Fighter hangars, bomber hangars, ammo bunkers, fuel bunkers, and radar towers all stay down only 5 minutes after being destroyed. All other objects, once destroyed, stay destroyed the whole frame. All objects will respawn at the start of the next frame. Also note hardness of various objects below.
Auto Acks: Reduced lethality, including for "puffy" ack. See setting below, where 1.0 is normal in Main Arena.
| Variable | Default Value | Explanation of Variable |
| BomberWarningRange | 36,960 (7 miles) | A base starts flashing when an enemy bomber gets within this number of feet. |
| CommunicationFlags | 3 | Various communication flags. |
| DeathMaxCount | 0 | After this many deaths, you have to wait DeathTimeMin before spawning the next time. |
| DeathTimeMin | 0 | How long in minutes you have to wait before spawning after DeathMaxCount deaths. |
| DownTimeMult | 5.0000 | A multiplier for down time of objects. For example, if Bunk Ammo has a Down Time of X and if DownTimeMult = Y, the actual down time for Bunk Ammo is X*Y minutes. |
| EnemyIconRange | 9000 | Enemy icon range in feet (9000 = previous .icon 1). |
| EnemyLowIconRange | 9000 | Has to do with icon range when altitude is low. |
| ExitWhileMoving | 460 | Various flags on whether or not a player can exit whilemoving. |
| FighterWarningRange | 31,680 (6 miles) | A base starts flashing when an enemy fighter gets within this number of feet. |
| FogVisibilityMiles | 17.00 | Visibility in miles. |
| FriendlyIconRange | 15,000 (5k) | Friendly icon range in feet. |
| FuelBurnRateMult | 1.0000 | The multiple applied to fuel burn rate. 2.0 means fuel is used at 2x real-life rate. |
| GroundAutoLethality[Armored] | 0.30 | See "GroundAutoLethality" section. |
| GroundAutoLethality[Hard] | 0.30 | See "GroundAutoLethality" section. |
| GroundAutoLethality[Soft] | 0.50 | See "GroundAutoLethality" section. |
| KillShooter | 1 | If this is 1, you take the damage if you shoot a countryman. If this is 0, he takes the damage. |
| ObjectHardnessMults[SHP] | 6 | For CV hardness = 28,000 lb; CA and DD hardness = 12,000 lb. Merchant ship hardness is set at 5,500 lb in the terrain. |
| PerkPointsDisabled | 1 | 1 if awarding of perk points for kills is disabled. 0 if it is enabled. |
| PlayerResupplyTime | 0 | Minutes of downtime subtracted from down objects when supplies are dropped at a base. |
| RadarAlt | 30,000 | If a plane is under this altitude, it won't show on dot radar (unless full friendly or full enemy is selected). |
| RadarMode[Bishops] | 394 | Tower friendly, tower enemy, counters above radar, range based counters. |
| RadarMode[Knights] | 394 | Various flags for setting radar attributes. |
| RadarMode[Rooks] | 48 | Various flags for setting radar attributes. |
| RadarUpdateRate | 120 | Radar updates every 2 minutes. |
| RandomRotate | 0 | Whether or not a Country Reset rotates countries randomly. |
| ResetAirFieldCnt | 1 | If a country has less than this many airfields, the war is won, and the arena does a reset. |
| ResetTotalFieldCnt | 1 | If a country has less than this many total fields, the war is won, and the arena does a reset. |
| SectorCounterAlt | 1500 | If a plane is under this altitude, it's won't show in the sector counters. |
| SectorCounterRange | 331,920 (45 miles) | If RadarMode is set to have Range Based Counters, this is the range in feet from the radar station that a plane has to be in order to show in the sector counters. |
| StratFlags | 1 | Disable strat supply. |
| TaskGroupRespawnTime | 1000 | Down time for CV. |
| TowerBasedRadarRange | 258,160 (35 miles) | The range in feet from a radar station for dots to appear on the radar display (unless full friendly or full enemy is selected). Maximum Range Allowed In Settings |
| VehicleWarningRange | 15840 | A base starts flashing when an enemy vehicle gets within this number of feet. |
| ViewModeFlags | 2 | Various flags for view. |
Note in the object settings below, "Down Time" is not the actual down time in minutes. Actual down time in minutes is "Down Time" times DownTimeMult given in the above table.
| Object Name | Down Time | Hardness (1000 lb) | Explanation |
| Bomb Hgr | 1 | default | Bomber hangar. (Down time) * DownTimeMult = 5 minutes |
| Bunk Ammo | 1 | default | Ammo bunker. (Down time) * DownTimeMult = 5 minutes |
| Bunk Fuel | 1 | default | Fuel bunker.(Down time) * DownTimeMult = 5 minutes |
| Bunk Radar | 1 | 100 | Radar tower nearly indestructible. (Down time) * DownTimeMult = 5 minutes |
| Ftr Hgr | 1 | default | Fighter hangar. (Down time) * DownTimeMult = 5 minutes |
| Ship | -- | 1.72 | DD and CA = 12,000 lb; CV = 28,000 lb. (Modified to account for SHP Multiplier) |
| Town | -- | 0.75 | Town buildings. |
All other settings are the default settings listed here: http://ahevents.org/images/stories/scenarios_images/defaultSettingDocument/defaultArenaSettings.html
Â
For CM's:
CM Reference
MOTD. The following can be copy and pasted to use as the MOTD, with appropriate number for frame number.
Welcome to the scenario "Mediterranean Maelstrom"!
Show up at or before 3 pm Eastern Time to play.
If you are not registered, you are welcome to play,
but please change to country Rook,
go to [], and type on channel 200,
"Walkon requesting assignment."
If you need back in and the arena is locked, please
enter ".p Brooke let me in" into a radio text buffer
such as from the Main Arena. Try getting into the
arena thereafter even if the games says the arena
is locked -- the screen doesn't update quickly.
Once in, type ".p Brooke i'm in".
Allies = Bishops
Axis = Knights
walkons = Rook
CM checklist. Prior to Show-Up Time:
- Announce to players to remind CM if he doesn't announce "logs started".
- Load terrain.
- Rotate countries if needed. Make sure axis fields are Knight, allied fields are Bishop.
- Load tables.
- Change field ownership if needed.
- Set MOTD.
- Check that correct planes are enabled at correct fields -- make sure ground guns are enabled everywhere. Save if any changes done.
- Check arena variables and resave all the non-default ones. Save if any changes done.
- Set object settings.
- Destroy any objects needed.
- Set .icon.
- Set wind.
- Remember to do .startlog before takeoffs.
- Get walkon field number for axis and allies.
Timing Table
| Event | Real Time | Tower Clock | Event tasks |
|
S (Show-Up Time) |
3 pm Eastern, Noon PT | 12 noon |
|
| S+20 |
| ||
| S+25 = T-5 (Takeoff Countdown) |
| ||
|
T-0 (Takeoff) |
12:30 pm PT | 12:30 pm |
|
| T+3 hours | 3:30 pm PT | 3:30 pm |
|
| T+3.5 hours (Frame End) | 4:00 pm PT | 4 pm |
|
| T+3.6 hours (End Log) | 4:07 pm PT |
|
References / Suggested Reading
Operation Pedestal
Race to Malta
Malta and World War 2
Comando Supremo - Italy at War
BBC - Siege of Malta
SS Ohio and Operation Pedestal
Luftwaffe over Sicily
Merlins over Malta
Malta: The Spifire Year 1942 by Christopher Shores and Brian Cull ISBN 0-948817-16-X
The Campaign for North Africa by Jack Coggins ISBN 0-385-04351-1
Designer Historical Notes:
With each scenario we balance play and the planeset to bring to you historical battles. In this scenario there are a few things which do not line up with history. I wish to point these out for the sake of accuracy and understanding of the events we are depicting. Also a few explainations for some rules.
Credits
Scenario design: Fencer
Terrain: 68Falcon
Scenario CM's: Brooke, Fencer (Team Lead), Soulyss, Corkyjr, and ROC
Allied CO: Waystin2
Axis CO: KCDitto